How To Start a Fire With Sticks:
Let's say you're camping or hiking, and you're sure you have everything you need. Unfortunately, you've managed to forget the matches! Knowing how to start a fire with sticks using "the bow-drill method" described below might save your life. Even though it might be a slow and possibly frustrating way to start a campfire, it could save your life or at least impress your camp-mates.
Note: This is the method prefered by the Boy Scouts of America and Girl Scouts. The Firecrafter rank requires you to make a fire in this way.
Find tinder. Basically, anything that is dry, fibrous, and will take a spark, or "catch" and ignite should do (pocket lint, feather down, dried mosses, and shredded plant fibers such as cedar bark, are examples).
Gather firewood. Gather several handfuls of kindling, typically tiny pieces of wood in various sizes, starting with some that are as thin or thinner than a toothpick, but longer; then several handfuls of wood about the thickness and length of a pencil; and lots and lots of wood bigger than this, up to about the thickness of your arm. Avoid wood laying on the ground (it may be damp); instead look for snags (dead branches that have fallen off trees but get caught in lower branches or on bushes, so they aren't just laying on the damp ground). It is possible to snap dead branches from trees but only take those that immediately snap free; if it bends without breaking, it's still alive or not dry enough. Avoid green wood since most won't burn well at all. See the Things You'll Need section below.
Make a nest. Use small fiber, such as cattail, to expand the coal and slightly thicker fiber on the outside. For example use dead fern "leaves" and dry leaves on the very outside to shelter the nest. Make sure you leave a hole for the coal. There can be many layers but the one used to expand the coal doesn't burn well, so don't use too much of it!
Make a bow. Use slightly bendable wood for the bow. You'll be putting a lot of pressure on the bow, and dead wood is more likely to break than similarly sized green wood. Beginners should make a bow 1.5 to 2 feet long. Use as thin a piece of wood as you can so the bow will be as light as possible. A lighter bow is easier to control and takes less strength to push back and forth. But it has to be stiff enough to not bend when you're using it. The bow doesn't actually have to have much of a curve to it. I've used bows made from sticks that are perfectly straight, and they work just fine. The hard part is figuring out how to best attach the shoelace (or whatever you use) to each end of the bow. You need a little slack in the cord so that you can twist the drill into the bow. Once the drill is in the bow, the tension should be nice and firm. But that's getting a little ahead of things.

Make a fireboard. The fireboard and the drill both need to be some kind of light, dry, non-resinous wood. In reality, you should be able to make this work with any kind of wood, but the kind of friction you'd have to generate with two pieces of green wood or hardwood is enormous! The best wood for this won't have any sap, and will be light and soft enough to easily dent with your thumbnail without gouging. Shape whatever wood you choose into a piece about an inch thick, 2-3 inches across, and at least twelve inches long. Set it aside for now.

Make a drill. Your drill can be made of the same kind of wood as the fireboard or a different kind. Just as long as it doesn't have any pitch in it, is light and fairly soft. I prefer fat drills, about 1 inch thick. Other people prefer more narrow ones down to maybe 1/2 inch thick. If you're little and light, smaller drills are better. Start with a stick about as thick as your thumb or index finger. It should be at least eight inches long, and the straighter the better. I whittle my drills until they are perfectly straight and perfectly round. It makes life SO much easier! What will be the top end of the drill should be shaped like the end of a pencil, the bottom end should be more blunt. Take some time to get the drill just right. It will pay off. The top of the drill must be sharper so that there is less friction.
Find or make a socket. Your socket can be made of bone, wood, or rock. If you're really lucky you'll find a rock that you can easily hold in your hand, and that has a nice smooth dimple in it that will take the pencil-sharp end of your drill. A fist-sized rock is better than a tiny one, as the friction can heat the thing up really fast if it's small. But you have to be able to hold it and control it. The deeper the dimple, the better. The smoother the sides of the dimple, the better. You're trying to avoid any and all friction between the socket and the drill. If you can't find a rock, the easiest socket to make is wood. It should be small enough for you to comfortably hold in your hand, but big enough that your fingers don't wrap all the way around it and touch the drill as it's turning. It is best to make the socket out of hardwood if possible, or use a knot in softwood as a naturally lubricated socket. Use the tip of a knife or sharp rock to drill a hole no more than halfway into the wood. Be very careful not to slip and cut yourself during this process! Of course, other things can be used as sockets. One person used a little glass lip balm container as a socket. Basically, whatever you can find or fashion is fine. lubricate the socket with resin, chap stick, whatever. (Do not use water.)


Find a coal catcher. Last but certainly not least, you'll need something to catch the coal that's created, keep it insulated from the cold ground while it becomes a coal, and carry it from the ground to the tinder. This can be a dry leaf, sliver of wood, piece of paper, bark, etc. Whatever it is, make sure you can pick it up without fumbling around and dropping it.
Burn a hole. Here's where everything comes together. Notice that you haven't cut any notches in the fireboard yet. That's because you need to know where your drill is going to spin on the fireboard before you cut the notch. Take the fireboard and mark a spot about 1.5 times the drill's diameter from one of the fireboard's long edges. Dig a crater there about 1/4 inch deep and about as wide as your drill. Put the fireboard on the ground. (Reverse the following for lefties). Put your left foot on the fireboard about one inch to the left of the crater. The arch of your foot (not the ball or the heel) should be over the fireboard. Make sure the ground is pretty flat or bed the fireboard into the ground; you don't want it to wiggle or rock much if at all. Kneel on your right knee. Make sure that your right knee is far enough behind your left foot that you make all 90 degree angles. (More about that later.) Hold the bow in your right hand, drill in your left. Put the drill on top of the string with the pencil-sharp end pointing right, and twist it into the bow. If it's too hard to do, loosen the string a bit but the string must not slip once wrapped around the drill. Put the blunt end of the drill on the crater. Put the socket on the drill. Grab as close to the end of the bow as you can. Put some downward pressure on the socket and start to pull back and forth on the bow. It's a delicate balance between putting too much and not enough pressure on the drill, and having the bow string too tight and not tight enough. Most likely something's going to go wrong; troubleshooting later. For now let's just assume you're amazing and things go right. You'll saw back and forth with the bow faster and faster, and put more and more pressure on the socket, and finally you'll get some black powder down around the bottom of the drill, and some smoke. Excellent! Now stop and pick up the fireboard.

Cut a chimney. Use your cutting device to make a V-shaped notch that reaches from the edge of the fireboard almost to the center of the hole you just burned in the fireboard. There's discussion as to whether a U-shape is better than a V-shape, and whether wider is better than narrower. The most important thing is to make sure that it's not so wide that when you start spinning the drill in the hole again, it just slips out through the notch. About a "sixth of a pie" is good. Also, make sure you don't cut right to, or past, the center of the hole, but you do want to get close to the center. Like Goldilocks, you want it just right.
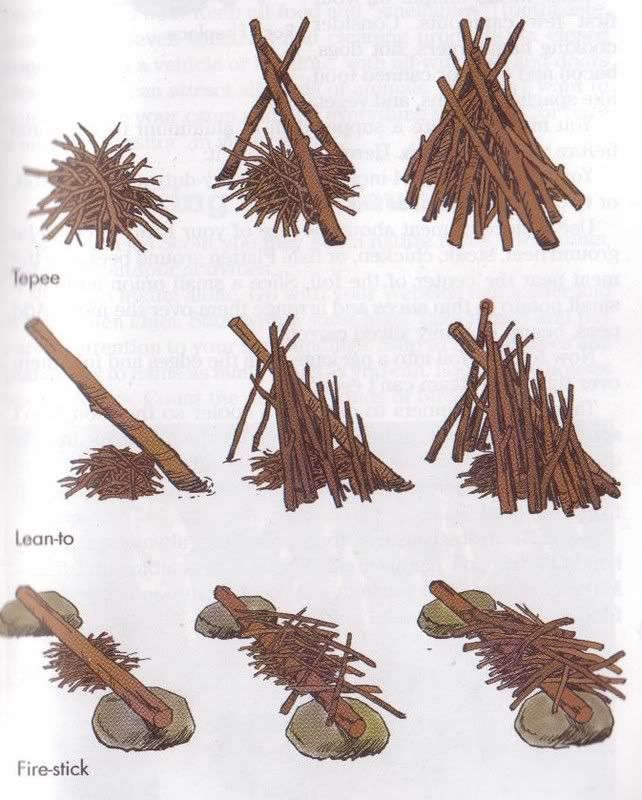
Make a teepee or "house" out of wood. If you like, make a floor to absorb moisture. Putting sticks at right angles works well. Remember the order tinder, small sticks, larger sticks, larger, larger... do not forget to leave a hole in your house to put the coal into and spaces between sticks so your coal can "breath."
Make a coal. Now it's time to make fire! You do everything the same way you did when you burned a hole in the fireboard, just don't forget to put your coal catcher under the chimney. Start pushing and pulling on the bow, and pushing down on the socket. As you get into a rhythm, saw faster and put more pressure on the socket. Eventually you'll get black powder collecting in the chimney. Keep going, and you'll get some smoke. When you've got smoke coming out of the punk all over, you've most likely got a coal. If you're not sure, keep going until you just can't go anymore. If it starts to squeak, you're starting to glaze the set and need to push down harder while keeping up the speed! Sometimes you'll actually see the tips of the punk turn white (or if it's getting dark, red) and then you'll know for sure that you have a coal. Great! But you're not out of the woods yet...sorry for the bad pun.
Blow the coal into flame. Carefully remove the drill and lift away the fireboard, using a twig to hold the new ember down if it gets stuck in the notch. Use one hand to gently fan air over the coal, making it bigger and more solid, using up more of the punk. Don't blow on it unless you blow very gently, as you might knock it off the coal catcher. This isn't necessarily a disaster, as the coal usually won't fall apart. But if the ground's wet, it'll put the coal out, and if you're not careful picking it back up you might put it out. Once you're sure the coal isn't going to go out, transfer it to your tinder. Raise the tinder in front of your face and slightly overhead on the downwind side, and begin blowing softly through the bundle while gently squeezing the tinder around the coal. As more tinder catches, you might have to turn and/or reshape it to keep the ember spreading into more and more of the tinder. Keep blowing and working with the tinder bundle until you get actual flames. Put it on the ground where you want your fire. Keep blowing if you need to to keep the flames going, and add the toothpick size sticks on top of the bundle, then the pencil sized sticks, and bigger and bigger stuff until you have your campfire.
If you can, find someone that has done this and have them teach you. It'll save you hours of grief!
Practice makes perfect. Do this at home in your spare time, so your body will learn how to do it! Do it several times and you will always know how to do it.
If you have a good coal in your nest, the nest will literally burst into flames so be ready with the rest of your fire before actually lighting it.
Good technique is extremely important! You can use all kinds of materials - good, bad, or indifferent - and get fire where other people can't if you have the technique down cold! One good method is as follows (reverse for lefties of course): 1) Left foot on fire-board, about one inch from the drill or closer, arch over the fire-board. Angle of your left knee is 90 degrees. Angle of your left leg to right leg is 90 degrees. (In other words, if someone was looking at you from the side, they'd see a big square with one side being the ground, another side being your left leg from the foot to the knee, another side being your left leg from the knee to the hip joint, and the last side being your right leg from the hip joint to the knee. Right knee is on the ground. If your left foot was placed on a line, your right knee would be on the same line. To balance, swing your right foot around to the left. (This opens up your body to the right.) Your left hand holds the socket, and your left hand should be tight up against your left shin bone. This helps you to hold the top of the drill completely still. This position will put you leaning over the whole set-up, and allows you to use the weight of your upper body to push down on the drill instead of just using your arm strength.
The next most important thing is to get the right combination of woods for the drill and the fire-board. If you're in a real emergency situation, you won't have much choice. The first decent piece of wood you find will have to do. But if you have some time, gather different woods and use different combinations of them until you find the best set. Some people that swear Yucca on Yucca is the best, and others that swear just as hard that Seep Willow on Saguaro (a protected species, so find out what the law on using it is before using it) is the best. I've found that just about any soft, dry, non-resinous wood works, but some combos of the same plant work better than others, depending on how long the particular plant has been dead.
Some people prefer to use a harder wood for the fireboard and a softer wood for the spindle. Since the fire-board is usually less than an inch thick, it doesn't take too long to burn through it if it's soft wood. A spindle made of the same wood as the fire-board will burn a number of holes through the fire-board long before the spindle is used up. Since cutting chimneys and burning new holes in a fire-board takes a long time, it is preferable to do it less often.
Some people prefer spindles of about a hand's span in length (maybe 10 inches). They tend to not pop out of the fire-board or the socket as much as a short spindle. And they last a long time before being worn down to little stubs.
It's important to keep the string tight so that it doesn't slip on the drill. But if it's too tight, it will make the drill pop out of the socket or the fire-board. There are a number of ways to deal with the string adjustment. 1) One way is to just tie good knots at exactly the right point so that the string is just the right tightness, nothing slips, the string never stretches, and the spindle never compresses. This being an imperfect world, that doesn't happen very often. Get the string almost tight enough, hold at the very end of the bow, and then squeeze the string up against the bow as you start to saw back and forth, if needed. Even if you get the string just right at first, it often will loosen up as you're sawing back and forth, so this is a good technique to master. If needs be, work your hand up the bow to get the string tight enough. This is a good reason to have a longer (two feet long) bow. 2) To keep the cord firm, you might have to loop it around your finger(s) or adjust it by tying a tighter knot. 3) Another way to keep it tight is to put another stick, (preferably thick, as this method can snap smaller sticks), in another loop, near the end. Twirl it around and around until you reach the desired tightness, and then 'lock' it against the bow. If it keeps slipping, then hold that end in your hand.
Chimney shape is important, but not essential, so long as it is slightly wider at the bottom than at the top. A narrow shape is preferable, about "1/6 of a pie," U-shaped, but V-shaped notches work too. The chimney is where the hot powdered wood is going to collect and meet up with air, allowing it to turn into a coal. A wider chimney usually means you'll just have to create more punk (the hot powdered wood), but also allows more air in.
Keep the bow in the middle of the drill. If the string moves up the drill it will create more horizontal force up near the socket and will be more likely to pop out of the socket. This is one of the reasons I like longer spindles. If the string moves one inch up a 10 inch spindle, it's not as bad as if it moves one inch up a four inch spindle. To fix this, keep sawing away, but rotate the bow up in the Y-axis (so the bow would touch the top of the drill if you rotated it all the way up). The same is true if the string works its way down the drill. Rotate the bow so that it would touch the drill near the ground if rotated all the way. The bow string should always be horizontal to the ground (if the ground is perfectly flat) and perpendicular to the drill. Don't dig the tip of the bow into the ground, or up into the sky, ever. Learn to keep the bow flat and level as you saw back and forth.
The notch and the drill end that goes into it should both be rough, not shiny and smooth. The roughness promotes friction. If they get shiny, put a little sand in the notch. This is an old Native American trick that many settlers missed.
Don't be afraid to take a little break if you're tired. This takes a lot of energy when you're first learning, unless you're one of those people that's just a natural. If you are, lucky you. For the rest of us, taking a break to regain some strength can make the difference between a warm, comfortable night in the friendly woods and a cold, dark night in the inhospitable wilderness. Try getting the notch nearly full of dark wood dust, then taking a break. Once you are rested, you can "pour it on" right away to bang out a coal since the notch is filled and ready to go. Or, as soon as you tire out, let someone else jump in and knock out the coal before the dust cools down.
If there are two of you trying to "bust a coal," you can "go tandem." One person sets everything up normally, but before starting to saw away, the second person kneels down opposite to the first, puts their left hand on top of the other guy's left hand (which is on top of the socket), and takes hold of the bow with their right hand. The first person is the lead, and starts sawing away, and the second person adds their strength and speed by pushing down on the socket and pulling back and forth on the bow. This can take a bit of coordination, but makes busting a coal a lot easier, especially the first time.
An alternative method is to rapidly rub the drill along a groove in the fire-plank. This is the "fire plow" method that Tom Hanks supposedly used in "Castaway." Make a quick, exaggerated "pool cue" motion (forward and back, drill at an acute angle to the fire-board) in a 4-6 inch groove, until a pile of hot wood dust builds up at the end of the groove and forms an ember. This requires fewer materials than the drill method and takes less dexterity (which would be good when your hands are very cold), but it requires more raw strength and a lot of coordination to stop each stroke at exactly the right spot to avoid blowing away your hot dust pile.
It's been found that this is easier if your hands are somewhat sticky (i.e. with pitch).
place the NOTCH on top of your tinder "NEST" and you won't have to transfer the coal risking losing it. the coal falls directly into the nest. this method dramanticly shortens the effort required.
WARNINGS:
Caution: drill, board, socket and fire are hot.
Not a practical way of making a fire. Takes much practice and does not always work, especially in survival conditions (shaking hands can screw it up).
If you know you're going to have to make fire this way, and you don't have a flashlight with you, make sure you plan plenty of time for it before night fall. Experienced campers have been doing this for years and still have difficulties doing this in the dark. Even if you do have a flashlight, do this during daylight hours. You'll be glad you did.
When you're done with the fire, cover the ashes, and make sure it's out!
Be very careful about what kind of wood/leaves/twigs you burn. For instance, rhododendron is very poisonous, so make sure not to get wood/leaves/twigs from (under) it. Do your research beforehand so you know what to (and not to) burn.
Don't do this in an area under a burning ban.
Be sure to not let the board rock as you are drilling. If it does, the change will cause the air trapped in your sawdust to collapse on your ember, effectively smothering.
While this is a good skill to have and it will certainly impress people, it is best to buy a couple of aviation magnesium and flint fire blocks. They are cheap, small and each one will start several fires. Just clip one to your backpack and slip one in your pocket and you will have the ability to make fire anywhere that you can find fuel to burn. You should never assume that you can just gather together the pieces to make a good bow set and start a fire. Also, it takes a lot of effort to start a fire this way. In a survival situation, conserving your energy could mean the difference between life and death.
Things you will need:
Knife or sharp stone
Tinder
Fire-board made from a soft wood (such as cedar or basswood)
Drill made from the same or a softer wood (such as cottonwood root)
Bow made from a piece of "springy" wood (such as ash, wattle(only in australia), hickory, osage or any "green" wood) for an emergency bow
Leather or rawhide lace (such as a work boot lace) or a strong string such as 550 parachute cord
Socket made from either a smooth, dimpled rock or a piece of hard wood
Patience, most likely
www.wikihow.com/Start-a-Fire-With-Sticks